Jobs
Jobs are the work orders that track every service visit from first contact through completion. A job connects a customer, scheduled visits, assigned team, invoices, and all the activity around getting the work done.
Open Jobs from the main navigation.
When to use Jobs
Use Jobs when your team needs to:
- Track work from request through completion.
- Schedule visits and assign technicians.
- See which jobs are pending, in progress, completed, or cancelled.
- Link invoices and quotes to a single work order.
The job list
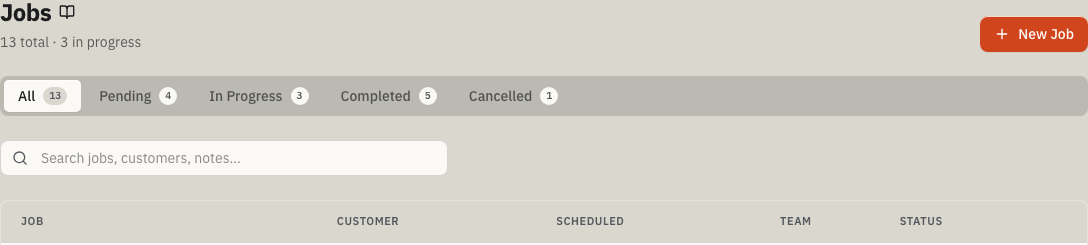
The job list shows every job in your account with a header displaying the total count and how many are currently in progress.
Status tabs
Filter the list by status: All, Pending, In Progress, Completed, or Cancelled. Each tab shows a count badge.
Search
Search by job title, customer name, notes, or description. ToolbagCRM searches the full matching job set before returning a page of up to 100 results.
What each row shows
- Job title — the name of the work.
- Customer name — clickable link to the customer detail.
- Scheduled date and time — the next scheduled visit or older job-level scheduled start when one exists, or "--" if no visit/date is stored. New calendar work is managed as visits from Scheduling.
- Assigned team — avatar stack showing up to three team members, or "Unassigned."
- Status badge — color-coded status indicator.
Create a new job
The New Job button appears for Administrators, Dispatchers, and technicians who have been granted job-creation access. Technicians without that access can still work their assigned jobs, but they should ask an administrator or dispatcher to create new work orders.
- Click New Job.
- Use Find customer to search by name, email, or phone, then select a Customer from the dropdown (required).
- Enter a Title such as "Bathroom remodel" (required).
- Add a Description explaining what needs to be done (optional).
- Assign one or more Team Members from the multi-select field (optional). If no active team members exist yet, ToolbagCRM shows a prompt to add or invite a team member before assigning the job.
- Optional: turn on Schedule first visit now to put the new job on the calendar immediately. Choose a required Start time, add an End time if you need a custom window, and add Visit notes for crew instructions.
- Save the job.
New jobs default to Pending status. If you leave Schedule first visit now off, create the job first, then use Schedule Visit from the job detail page to put that work on the calendar. If the optional visit cannot be created, the job still saves and ToolbagCRM tells you to schedule the visit from the job detail page.
Job detail view
Click any job row to open the full job detail. The detail view includes:
Header
- Job title with a Job status dropdown for authorized office users. Selecting a different status opens a confirmation that shows the current and proposed status, any known effects, and an optional reason saved with the status history.
- Created date.
- Schedule Visit link that opens Scheduling with this job selected. It appears only while the job is Pending or In Progress; completed and cancelled jobs keep their existing visit history but cannot receive another visit.
- Edit button for authorized office users to update the job.
Metadata grid
| Field | Content |
|---|---|
| Customer | Name linked to the customer detail page |
| Visit schedule | The next non-completed, non-cancelled visit date and time. Future visits are shown first; if none remain but a visit is still Scheduled or In progress after its time window, the most recent one stays visible. With Scheduling access, use Manage visit or View visit for that visit and View all visits for the full calendar. No visits scheduled with a Schedule Visit link appears only when an open job has no visit still in Scheduled or In progress and no saved schedule. Completed and cancelled visits stay in Scheduling/history. |
| Work location | The job's attached work location. If none is attached, the row shows Not available; the customer's address does not substitute for a job work location. |
Field actions and job handoff
Users whose job access is limited to Assigned only get a field-focused view of the job detail:
- The Field actions strip shows Call and Text when the customer has a saved phone number and the user's role can read Customers. Directions appears when the job has a service-location address. Assigned field users who can update Jobs also see Start job on Pending work or Complete job on In Progress work.
- Start job opens a confirmation with the customer, visit, and work location before changing the job to In Progress. Complete job continues through the notes, photo, billing, and signature workflow rather than changing status immediately.
- The Job handoff card keeps Work scope, Handoff notes, available Access & safety details, and Parts & materials descriptions and quantities together. It also summarizes the completion evidence and customer-signature requirements that apply to the job.
Assigned team
Lists each assigned team member with their avatar and display name. Click Edit on the job detail to add, remove, or replace assigned team members; the edit sheet uses the same multi-select pattern as the new job form, shows a selected-team summary, and keeps currently assigned inactive members visible with an (inactive) label so you can remove or recognize historical assignments.
Description and internal notes
- Description — the work to be done, visible to the full team.
- Internal Notes — staff-only notes displayed in a separate warning-toned card. Use these for instructions the customer should not see.
Linked invoices
Lists all invoices tied to this job with amounts, invoice numbers, due dates, and status badges. A summary footer shows total invoiced, total paid, and outstanding balance.
Click New Invoice in this section's header to create an invoice for the job's customer without leaving the job detail. The dialog pre-fills the Customer and Linked job from the job you're viewing; the customer stays locked so the invoice remains on the right account, but you can change Linked job to No job attached if the charge should be customer-only. Review any copied job line items, then select Create Draft. If job pricing is not visible to you, ToolbagCRM can create an empty $0 draft linked to the job without exposing those amounts. Customer-only drafts require complete line items and a total above $0. After creation, the new invoice detail opens automatically.
Status history
Every status change recorded for this job with timestamps and who made the change.
Flow card
The Flow card combines the current job status, recent status history, related activity, and planned next transitions. Use its primary Advance to... action when you want to move the job one normal step forward, such as Pending → In Progress → Completed. The separate Cancel job escape action stays available even after the job reaches Completed; once the job is Cancelled, the card shows no further transitions or actions.
Job statuses
Jobs follow this status flow:
- Pending — Created but not yet started.
- In Progress — Work is actively underway.
- Completed — Work is finished.
- Cancelled — The job will not proceed but stays on record.
A future open job displays a Scheduled badge on the Jobs list, job detail, and field dashboard until its exact scheduled start. At that boundary, it displays In Progress automatically. A start with a UTC offset is honored as that exact instant; a date-only start uses the job location's time zone when available, otherwise the account time zone. A missing or invalid start does not trigger In Progress, and Completed and Cancelled remain terminal. This display does not change the saved job status, status history, available actions, or the status tab used to filter the Jobs list.
Use the Job status dropdown for an authorized office correction, or use the Flow card when you want the guided next-step action. Assigned field users get the narrower Start job and Complete job actions instead of the office status dropdown. Starting asks them to confirm the customer, visit, and work location first; completing still uses the full completion workflow.
Completing a job also reconciles its open visits. ToolbagCRM marks the latest visit already In progress—or, if none is in progress, the latest scheduled visit that has already started—as Completed, then marks every other remaining visit Cancelled. If no visit has started, every remaining visit is cancelled. The completion window lists the affected date, time, and crew and keeps Complete job disabled until you acknowledge the cancellation. If your role cannot view every affected visit, the window still warns that remaining visits will be cancelled. Review the schedule before confirming; cancelled visits stay in Scheduling history.
Before you start
- Make sure the customer record exists — the Customer field is required when creating a job, and the save button stays disabled until a customer is selected.
- Confirm the person creating the job has job-creation access. Administrators and Dispatchers can create jobs by default; technicians need an explicit create permission or an office teammate to create the job for them.
- If you want the job's first visit scheduled during creation, decide the start time before opening New Job. The optional Schedule first visit now section uses the team members assigned above, accepts an optional end time, and lets you add visit notes for the crew.
- If the job happens at a specific property or service location, choose it in the Work location field on the new-job form and keep its street address, city, state, and ZIP/postal code current so the job detail and weather strip show the right site.
- If you use invoicing, plan to finish jobs promptly so they flow into the invoicing workflow. A completed job is the fastest path to a draft invoice.
- Decide on a clear Title such as "Furnace tune-up" or "Bathroom remodel" — the title appears in search results, scheduling, and the customer's job history.
Tips
- Use Schedule first visit now in the New Job form when the first service window is already known; it creates the job and the first Scheduling visit in one flow.
- Schedule a visit for an existing job from the Scheduling page when you need the calendar's Day, Week, or Month views and crew filters.
- From a job detail page, use Schedule Visit to open Scheduling with the job already selected; this prevents accidentally scheduling the wrong customer or work order.
- Use the Visit schedule row to open the visit currently shown. Future visits appear first; if none remain, the most recent visit still marked Scheduled or In progress remains visible until its status is completed or cancelled. Use View all visits for the full calendar and history.
- If you are already in the job edit sheet, use its Schedule Visit link instead of hunting through navigation — it opens Scheduling with the same job context.
- Check the Work location row before the first visit. Jobs without an attached location show Not available; use Edit and select one of the customer's saved work locations before scheduling visits. Once a job has visit history, its work location stays fixed so past visits remain tied to the site where they occurred.
- On the field dashboard, use Next job to open the earliest upcoming assignment or use its Call, Text, and Directions actions when those details are available. On the job detail, the Field actions strip keeps those shortcuts beside Start job or Complete job.
- Review Job handoff before traveling or beginning work. It brings the work scope, handoff notes, access and safety details, parts and materials, and completion evidence into one field-focused card.
- Use the Flow card to advance a job through the normal sequence one step at a time; use Cancel job there when the job should stop but remain on record.
- Use internal notes for access codes, safety concerns, or special instructions the crew needs but the customer should not see.
- Use New Invoice on the job detail's Linked invoices section to bill for a job in one step — the customer and job are pre-filled, and you can leave the job selected or switch the dropdown to No job attached for a customer-only charge.
- Check the job history to see the full record when picking up someone else's job.
Troubleshooting
The job list says "Nothing on the schedule"
Click New Job to create the first job. If jobs existed before but the list is blank, check the search bar and status tabs — a filter may be hiding results. Click All to reset the status filter.
The New Job button is missing
Your role may not be allowed to create jobs. Administrators and Dispatchers can create jobs by default; technicians need job-creation access before the button appears. Ask an administrator or dispatcher to create the job, update your role, or grant job-creation access.
The save button is disabled when creating a job
A Customer and Title are both required. Use Find customer to search by name, email, or phone, select a customer from the dropdown, and enter a title before saving. If no customers match, try another name, email, or phone. If the customer list shows an error, check your connection and retry.
Search is not finding a job
The search bar matches job title, customer name, notes, and description. Try the customer's name if the job title is uncertain. If a status tab other than All is selected, switch to All — the job may be in a different status.
The Assigned team field is empty or disabled
Only active team members appear for new job assignments. Add or invite team members from Team first, then return to the job form or job edit sheet. If a team member was deactivated after being assigned, the edit sheet can still show that existing assignment with an (inactive) label so you can decide whether to leave it for history or remove it before saving.
I do not see a scheduled time on the new job form
Scheduling is visit-based and the first-visit fields only appear after you turn on Schedule first visit now. Leave the toggle off when you only need to create the job, then use Schedule Visit from the job detail later. Existing jobs that still show a legacy job date can be managed from the Visit schedule row once you add a Scheduling visit.
I cannot save with Schedule first visit now turned on
The Start time is required when Schedule first visit now is on. If you enter an End time, it must be after the start. Either choose a valid service window or turn the toggle off, save the job, and schedule the visit later from the job detail page.
The job saved but the first visit did not
The job record is kept even if the optional visit cannot be created. Open the job detail and click Schedule Visit to add the service window manually; use the same team assignment and visit notes you intended to add from the new job form.
Complete job is disabled
When Job Signature Capture is enabled, the customer must sign before the job can be completed. Select Capture customer signature in the completion dialog; it closes and takes you to Customer sign-off. Collect the signature and select Save signature before reopening Complete job. If saving fails, the signature stays on the pad so you can retry.
ToolbagCRM asks for completion notes or a job photo
Assigned field users must add completion notes that are new for this completion, or select at least one new job photo, before selecting Complete job. When adding a photo in the completion dialog, wait for it to upload successfully. If the upload fails and no completion notes were added, the job remains open so you can retry the photo or enter notes describing the completed work.
ToolbagCRM says a completed or cancelled job cannot be completed
A completed or cancelled job cannot run the completion workflow again. An authorized office user can use the Job status dropdown to reopen a completed job as Pending or In Progress, but must enter a reason in the confirmation. Assigned field users cannot undo Start job or reopen completed work themselves. After the office reopens it, review the latest details before selecting Complete job again.
Start wasn't confirmed
The job may have changed after you opened it, or ToolbagCRM may not have received a clear response. Review the latest job status and details, then retry Start job. A safe retry does not start the same job twice. If another user already changed the job, ToolbagCRM refreshes the detail instead of overwriting the newer status.
Call, Text, or Directions is missing from Field actions
Call and Text require a saved customer phone number and permission to read Customers. Directions requires a service-location address on the job. If a shortcut is missing, ask an administrator to check your role's access and ask an office user to add the missing phone number or service-location address. Start job and Complete job also require job-update access and appear only for Pending or In Progress assigned work.
I do not see every status as a Flow action
The Flow card shows the next normal status as the main action rather than every possible future status. For example, a Pending job advances to In Progress before Completed. A Completed job has no normal advance action, but Cancel job remains available until the job is already Cancelled.
ToolbagCRM says the work location must stay unchanged
A job with visit history keeps its original work location so completed and scheduled visits remain tied to the correct site. Keep the existing location, or create a new job for work at a different location.
A job was created by mistake
Job records are retained to preserve their customer, visit, invoice, and activity history, so the edit panel does not include a delete action. Change the job status to Cancelled and add an internal note explaining the mistake. If the work belongs to another customer, create a new job for the correct customer instead of trying to move the original record.