Getting Started
Use this section to learn the basics of ToolbagCRM and complete the first setup steps.
Create your workspace
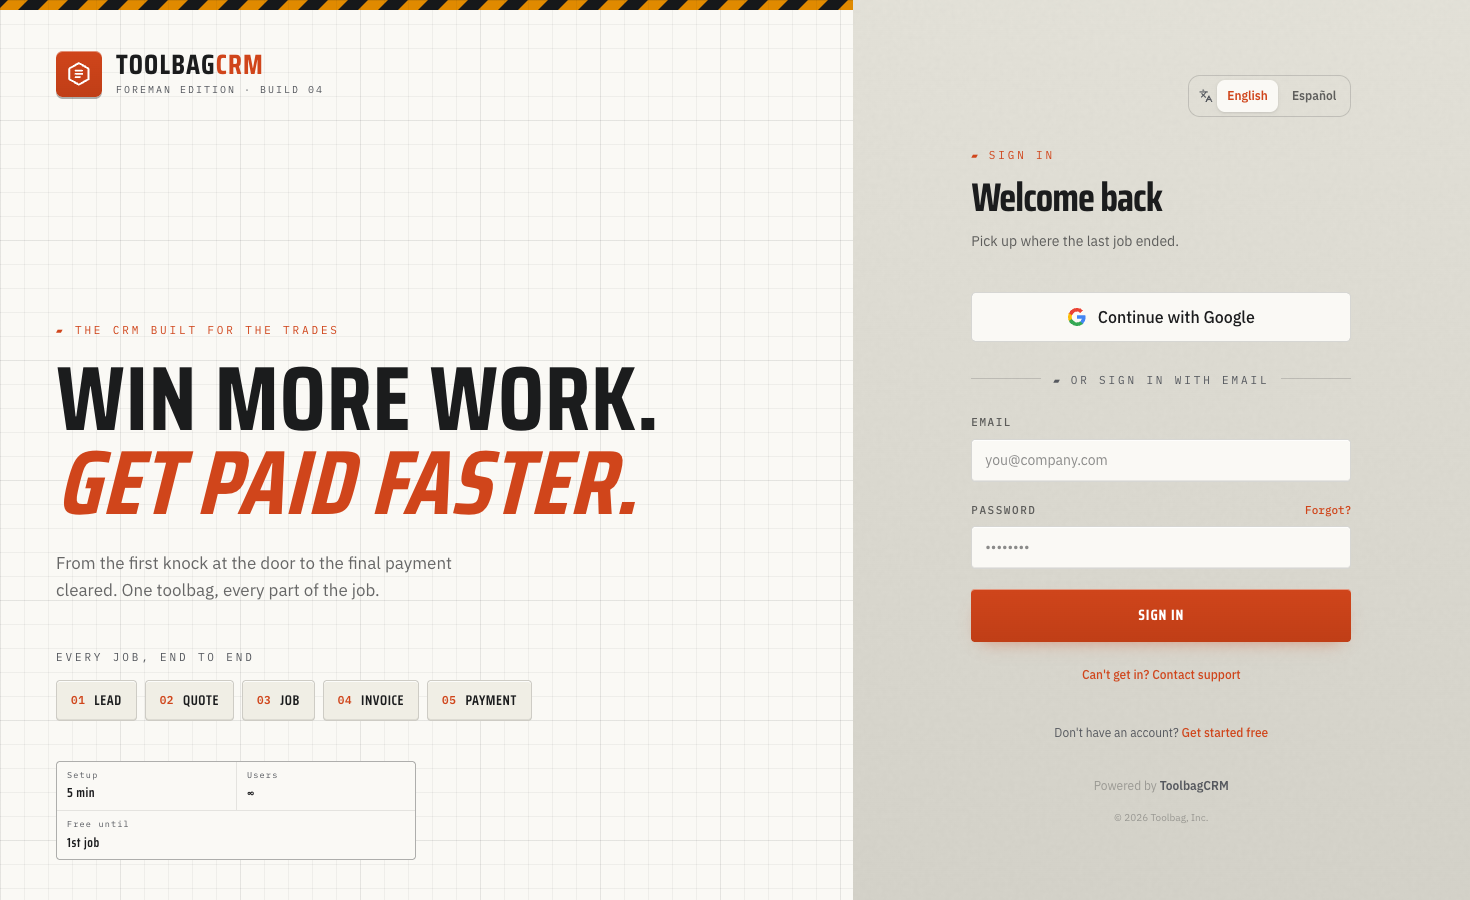
From the sign-in screen, click Get started free to create a ToolbagCRM workspace. The signup page now supports two entry paths:
- Sign up with Google — use a Google account to create the workspace, verify the email address, and sign in without setting a password first.
- Sign up with email — enter your company details and create a password if you prefer a standard email-and-password login.
For email signup, enter an ASCII address with a dotted public domain, such as user@example.co.uk or user+tag@example.io. If ToolbagCRM recognizes a likely typo after you leave the email field, select Did you mean …? to replace it with the suggested address before continuing. ToolbagCRM rejects malformed addresses before creating the account or workspace and shows Enter a valid email address with a public domain.
New workspaces start on the Free plan at $0/month with no card on file. Free-plan payments have a 2% ToolbagCRM platform fee in addition to card processing fees.
The optional Founders Plan gives an eligible workspace a one-time first month free, then costs $150/month plus the plugins you keep, with no ToolbagCRM platform fee. During the free month, every currently installable non-AI plugin is included without slot charges or a plan limit. AI plugins are excluded. When the month ends, the plan's normal plugin allowance applies again; if the workspace is over that allowance, ToolbagCRM gives you time to choose what to keep before add-ons are paused. Plugin data and settings are not deleted.
Switching from Free to a paid plan—including Founders while its first month is free—requires a saved card. Open Settings → Billing, select Add card under Payment method, and save the card before changing plans. If you try to switch without one, the plan dialog explains that a card is required and provides the same Add card action.
If a ToolbagCRM subscription payment fails, your workspace stays available until the pay-by date shown in Settings → Billing. Paying by that date keeps the paid plan. After the deadline, the workspace moves to Free and paid add-on plugins turn off without deleting their data or settings; the unpaid balance remains due. See Billing for payment, plan, and restoration steps.
In the ToolbagCRM demo, open Settings → Billing → Payment method and select Manage to use a simulated payment-method dialog inside ToolbagCRM. Select Use another demo card or Remove demo card to test the Billing state. The replacement or removal remains only for that Demo browser session; a new Demo session starts with the original sample payment method. Outside Demo, configured real accounts continue from Manage to Stripe's authenticated Billing Portal.
Google signup starts on the same /signup page as email signup. If Google sign-in is cancelled or the selected Google account cannot be verified, ToolbagCRM returns you to the sign-in page with a clear error so you can try again or use email signup.
The language selected on the signup page becomes the new account user's preferred language. For email signups, ToolbagCRM also uses that choice for the verification message, so selecting Español before submitting sends the supported Spanish version instead of silently reverting to English.
Verify an email signup
Email-and-password signups must verify the email address before ToolbagCRM opens the workspace. The confirmation screen shows a masked address. Open the verification link, then return to the original verification screen. ToolbagCRM automatically checks once when you return; if the confirmation screen remains, select Check verification status. This also works when you opened the link in another tab or on another device. Use Resend email if the message does not arrive. If the signup address is mistyped, select Start over or Use a different email and sign up again with the correct address.
Verify within seven days. ToolbagCRM sends reminders when three days and one day remain and waits a full day after the final reminder before removing the unfinished account and workspace. In the normal sequence, removal happens after seven days; if that final reminder was delayed, removal waits until at least one day after the notice. You can then sign up again.
If setup is interrupted by a page refresh, reopen /signup in the same browser tab. ToolbagCRM resumes the pending workspace setup without asking you to enter the password again. When setup finishes, it shows the email-verification step or sends you to sign in. If the page says Could not check registration status, select Check verification status to check again; use Resend email if the workspace is ready for verification but the message has not arrived. If ToolbagCRM says A verification email was just sent, wait for the countdown on Resend email to finish before requesting another. If it says We couldn't resend right now, try Resend email again.
If a verification link is invalid or expired, select Sign in to resend and sign in with the same email and password. ToolbagCRM returns you to the verification screen so you can send a fresh link. You can also select Start over to create the workspace with a different email address.
Sign in to the right business
If your email belongs to more than one business, ToolbagCRM verifies you first and then shows a Choose a business step instead of opening the dashboard immediately. Pick the business name you want to work in; the list can also show your role so you can tell similar accounts apart.
Single-business users go straight to ToolbagCRM after signing in. If your account uses two-factor authentication, enter the authenticator or recovery code first, then choose the business if more than one is available. To set it up or replace recovery codes, see Account Security.
If a business is no longer available
When ToolbagCRM confirms that the business you are using no longer exists, it closes your session and returns you to sign in with This account is no longer available. This is different from an ordinary permissions error. If you expected the business to remain available, select Can't get in? Contact support on the sign-in page and include the business name in your message.
Reset a forgotten password
- Select Forgot? on the sign-in page, enter the email address on your account, and select Send reset link. ToolbagCRM shows the same confirmation whether or not an account exists for that address, so check the inbox before submitting again.
- Open the reset link within one hour. Enter the same value in New password and Confirm new password, then select Update password.
- Use at least eight characters. Your organization may require a longer password, specific character types, or a password you have not used recently. If ToolbagCRM says password does not meet policy, choose a stronger, different password and try again.
- After the update, ToolbagCRM returns you to sign in. The reset closes your active sessions across every ToolbagCRM business tied to that email, so sign in again with the new password on each device.
If the link is invalid or expired, return to Forgot? and request a new one. If ToolbagCRM says Passwords do not match., re-enter both password fields so they are identical.
Get help when you cannot sign in
Select Can't get in? Contact support on the sign-in page if you are locked out, lost your two-factor device, or another issue is blocking sign-in. Enter your email, a subject, and a message, then select Send to Toolbag support. ToolbagCRM's human support team is available Monday–Friday, 9:00 a.m.–5:00 p.m. Eastern, excluding U.S. federal holidays. The team replies to the email address you provide, targets an initial reply within one business day, and triages urgent reports first during support hours. This form does not expose a public ticket thread or status page.
Retry a failed sign-out
After you select Sign out, ToolbagCRM shows Signing out… while it closes your session. If sign-out fails, it shows Couldn't sign out — check your connection and try again. Restore your connection and select Try again. Wait for the sign-in page before closing a shared browser so you know sign-out completed.
Complete the setup wizard
After the first sign-in, an account administrator can use the five-step setup wizard:
- Welcome — confirm the company name and choose the trade that best fits the business. Choose Other to enter a different trade. ToolbagCRM saves the confirmed trade with the workspace's company details.
- Branding — optionally upload a logo, choose a brand color, and select a dark, branded, or light sidebar style.
- Team — optionally invite team members by email and choose their access. Invitees remain pending on the Team page until they accept.
- Payments — review the Stripe connection option. Stripe is optional; you can connect it later from Getting started or Settings → Integrations.
- Ready — review the company, trade, branding, and pending-invite summary, then select Go to Dashboard.
Select Skip setup before confirming the first step, or Skip for now on an optional later step. If you return to Welcome and change the trade, select Continue again before skipping a later step; ToolbagCRM only saves the trade most recently confirmed on Welcome. After setup, an account administrator can update the saved trade and company time zone from Settings → Company. Use an IANA time-zone name such as America/New_York; ToolbagCRM rejects unrecognized values. Scheduled job badges use a service location's time zone when one is saved, otherwise this company time zone. If pending team invites must be sent, the action changes to Save and finish. The wizard no longer chooses plugins during setup; browse Marketplace after reaching the dashboard.
Choose your language
ToolbagCRM currently supports English and Spanish. Use the language selector in the application header to change available translated navigation and screens immediately, or open Settings → My Profile to use the larger language controls.
Your choice is saved to your account and returns after a reload or your next sign-in. If an unsupported language is submitted, ToolbagCRM keeps the previous supported choice; when no supported preference can be used, it safely falls back to English.
Customer message language is managed separately from your own interface language. When adding or editing a customer, choose that customer's Preferred communication language so supported quote emails, review requests, and reminders use English or Spanish for that recipient.
Language support applies only where translated interface text is available. Some areas may still appear in English.
Find pages and records quickly
Select Jump to in the sidebar, select the search icon in the top navigation, or press Command-K on macOS or Ctrl-K on Windows. Search can match enabled pages plus customer, job, invoice, and quote records.
Page matches appear under Jump to and record matches appear under Records. Use the up and down arrow keys to move through results, press Enter to open the focused result, or press Esc to close search and return to the control that opened it.
Start here
Core features
- Dashboard — Your business home screen at a glance
- Customers — Manage your customer directory
- Jobs — Track work from request through completion
- Quotes — Build and send price proposals
- Invoices — Bill customers and track payments
- Billing — Manage your ToolbagCRM plan, card, paid capacity, and outstanding balance
- Scheduling — Plan and assign field visits
- Team — Manage your crew roster
Next steps
- Browse the Plugin Marketplace to extend ToolbagCRM with optional features
- Plugin guides for detailed setup help on each plugin